Showing posts with label Built-Ins. Show all posts

Monday, June 1, 2015

Up Close & Personal With Our Office Built-Ins

Although we still have to put up the moulding, I wanted to share with you a few more up close pictures of the built-ins.  I am still struggling with styling the bookcases and making tweaks when a new idea pops in my head.  Most of the items on the shelves are from things we already had in the house and most, like the books, were packed away in the garage.  It was definitely nice to put some of  our favorite things all in one place.


Over the past six months, I have been scouring the clearance section at Target and picking up a few things here and there to add a little extra pretty to the office.


One of the first things I added was some of our favorite pictures of the girls and another set of books from the girls' library in a white basket from Target.  In true fashion, I did spray paint a few things that didn't match the color scheme like the picture frame below.


My NASA stuff has been packed away since I left in 2011, so it has definitely been nice to see some of it back out.  The painting of the shuttle on the slate was painted by my lovely husband...his talents still amaze me!


The shelves above the file cabinet are mainly reserved for our go-to items, like our planners and printer paper.


I found some magazine file holders at Target on clearance, but they were just plain cardboard so I wrapped them in wrapping paper to give them a little something extra.  I also found the paper tray holder on an online garage sale site and knew it would be perfect to hold our printer paper.


The box I found on clearance at Walmart during black Friday a few years ago is still going strong and holding our cords.


I also decided to spruce up some antlers with some spray paint!!


We did manage to install some hooks on another wall, a set of hooks on each side of the door.  One set is for Jeremy's photography bags and the other is for the girls' backpacks.


I am planning to cover a large cork board in some leftover fabric I have in the closet and hang above the girls' backpacks.  The plan is to use the cork board kind of like a message/information board.


Right outside the office doors is our entryway table, which has a basket on it that I drop our mail in before I sort through it.  Usually around the girls' nap time I will sort through the mail or later in the evening, so I wanted to create a little drop-zone in the office that was quick and easy.  I painted a few labels I had in my scrapbook pile with chalkboard paint and then attached them to the basket with some baker's twine. I then labeled some folders I purchased from Target about a year ago with my label maker.

There are still a few things left to do in the office, but we have been loving the new set up!  I am still working on organizing all of our files in the file cabinet and hope to share with you soon how I tackled that beast! 

With much love, 

Kristin 

Linking up with:

Thursday, May 7, 2015

Office: Built-In Bookcases

I hang my head in shame over here after realizing it has been months since my last post and update on the office remodel.  The last few months have definitely been busy around here with family time, birthday parties, weddings, and enrolling my baby girl in kindergarten....I can't believe that day is almost here!!  We haven't done much in the sense of home projects and when I seem to get quiet time I have been watching re-runs of Sons of Anarchy...I really miss that show!

Well, I totally digress and should give you a proper update on the built-in bookcases.  The last update left you with the cabinets, cabinet doors, and pine top installed.


Next up, the built-in bookcases!  Per the norm for our projects we had an eleventh hour design change.  The original idea was to build each vertical shelf individually and then install the shelves.  In between waiting for coats of paint to dry I decided to go back and read the blog post that sparked our inspiration.  Sarah, from Thrifty Decor Chick, had a brilliant idea and it could really save us a lot of time on the vertical part of the bookcases.

The supports for our bookcases are placed in a different spot than Sarah's since our cabinets were different widths than hers, but other than that the process was the same.  We constructed the verticals while it was laying down on the floor and screwed the supports into the board that would be the top of the bookcase.  Jeremy screwed two long screws into each support, while I held the board and made sure the screw didn't go out the side or splinter the wood.  Here is a diagram from Thrifty Decor Chick that shows how it all looked once ready to install.

SOURCE

At this point we were feeling pretty good about ourselves and thinking this was going to be awesome.  Well, it did turn out awesome in the end, but around midnight when we were trying to actually install the vertical supports things were looking bleak.  Since the built-ins go from wall-to-wall and the vertical supports were built in the office, it was a tight spot to lift the whole piece up and try not to damage the walls in the process.  We managed to get it up and installed still in one piece with minimal damage to the walls...nothing that couldn't be fixed with touch-up paint.  I will say it did get pretty comical for a while there...I guess that is what happens on lack of sleep and working past midnight, but all is well in the end!

The next morning, after a cup of coffee of course, we tackled installing the top board to the studs.  Again, per the norm for this house, nothing is ever perfectly straight and level so we had to do some improvising in some spots.


We had some backing leftover from a few Ikea dressers that we used in the girls' closet, and they were the perfect fit to fill the gap.


You might notice the mark on the ceiling, this was for the location of the studs.  We secured it to the ceiling beams and on each side of the wall.  Once it was secured, it was time to put the supports in for the shelves.  To make sure the verticals stayed straight and kept the same width, Jeremy temporarily secured a 3/4" cleat to the bottom of the bookcase.


Instead of adjustable shelves, we opted for permanent shelves with this bookcase.  For each shelf, Jeremy used the same process he used in the nursery closet and girls' closet.  Jeremy worked his way across for each shelf securing the cleats.  The cleat against the wall is secured into a stud.  


There will be 1x2's on the face of the entire bookcase so the cleats will be 'hidden'.  Here is a full view of the cleats all completed and waiting for the shelves to be installed. 


From this point, Jeremy installed the shelves using the same method he used for the girls' closet.   Unfortunately, this is where I dropped the ball again and didn't get any pictures of the shelves being installed.  I, also in all my excitement to start filling up the shelves, did not get pictures of the almost completed office.  


We still need to finish putting molding at the very top of the bookcase.  It will either be a decorative molding at the top or crown molding all the way around the room...decisions, decisions!  I still struggle at styling bookcases, so it is still a work in progress.  Since this picture was taken, quite a few shelves have already been rearranged.  I can't wait to show you a better picture and more details of what is on the shelves...until then, please share any tips on styling bookcases you might have up your sleeve! 

With much love, 

Kristin 


Tuesday, February 17, 2015

Office Built-Ins - Cabinets & Counter Install

I last left you with an update on the office back in November...sheesh, that was a long time ago.  Back in November, Jeremy had completed the construction of the cabinets and installed them into the studs, but that is where we left everything until a few weeks ago.  We got our behinds in serious gear and pushed forward on finishing up the office.  Also, when I say 'we' that is probably an overstatement...Jeremy did most of the labor and I was his cheerleader and painter.  So, while he was busy constructing, I was busy shopping our home for what I could eventually fill the built-in bookcases with!   I also know I have been dragging my feet on writing this post and the next few because I am impatient and just want to get to the final product...definitely Miss Impatient over here!!

Enough of that, let me show you a few pictures from the installation process.  The cabinets were already installed, so now it was time to install the file cabinet.  I purchased the file cabinet used and sanded down the face of the drawers knowing we would be painting everything white later.  The file cabinet wasn't the same height as the cabinets so we had to use shims to level it all out.  Then there was also the issue of filling the gap between the cabinets and the file cabinet.  Originally, there was supposed to be a 3-foot cabinet in that spot, but since the cabinets were already built we had to do a slight change of plans to get the file cabinet to work and filled the gap with a spare piece of wood.  To  have a nail-able surface, Jeremy first nailed a 1x2 board to the side of the cabinet and file cabinet.  With this in place, he could nail the filler piece to something secure.  


The same concept was used to secure the file cabinet to the wall.  Jeremy used another 1x2 to create a nail-able surface and then screwed the file cabinet in place.  He also had to fill the gap at the bottom of the file cabinet, which he used the jig saw to cut down a piece of wood to fit in the spot.  At this point, things are definitely not winning any awards in the pretty department and still so much to do, but to have all the cabinets installed felt like a tremendous victory!  

Before we started installing the file cabinet, we placed an online order for the cabinet doors since they would take about 10 days to arrive.  While we waited for the doors, Jeremy worked on making all the seams flush.  Thank goodness for water putty - this stuff is awesome!!  Simply mix with water, but suggest you make small batches because it dries quickly.   


After a few cans of water putty and sanding, all the seams were looking pretty fly!!!  During that process, the beautiful doors arrived.  

  
We cannot say enough about this company, Cabinet Now, we absolutely love our doors!  They make the doors to your specifications, just provide the measurements and pick the style you like best.  They will even pre-drill the holes for the hinges - well worth every penny for these beauties.  Jeremy put the first coat on the doors and during nap time, I finished up with two more coats of Behr Ivory Mist in a satin finish.      

While I was painting the doors, Jeremy was working on the counter top for the cabinets.  For the sub deck we used MDF, and used shims to help level it out.  The sub deck had to be perfectly level before we could put the pine top on.  Once the sub deck was level, Jeremy nailed the pine top onto the MDF sub deck.  Then he put a pine 1x2 board across the face of the counter top.    


The picture in the bottom right shows the counter with two coats of the stain on it, but ended up putting another coat on since I wanted it a little darker.  You can also see the bead board was installed as well using a little glue and a nail gun.  I painted the bead board after installation and then Jeremy stained the counter top.  The paint I used was oops paint I purchased from Lowe's for $5.00, Valspar Allen + Roth Jazz Club.  As you can see the bead board does not go all the way to the top, which was done on purpose for our original design for the bookcases.  However, we had another slight change in plans, which I will share with you all in the next post.  

You can also see in the picture above that the doors are installed, but sadly no pictures were taken of this process.  

Here is a picture of the pre-conditioner and stain we used, which I highly recommend pre-conditioning first before any staining!   


While, I know this isn't the most exciting post, I wanted to break up the construction/installment posts so it was an overload.  Stay tuned for how we constructed the bookcases and hopefully that post will come sooner rather than later!  

With much love, 

Kristin 


Follow on Bloglovin

Monday, November 3, 2014

Office - DIY Cabinets

Well, I finally have an update on the office.  Progress has definitely been slow when it comes to the office, but that is life I suppose.  I wish I had a magic wand and poof the office would be all done, but unfortunately my wand is on back order!!  We (aka Jeremy) have been able to make the cabinets, no doors yet, but the box of the cabinets have been completed and installed in the office.

Pulling from our main inspiration, the plan was to go with pre-fab cabinets from a box store, but after taking some initial measurements we realized we would have to make them ourselves.  At the box stores, you can get a cabinet with a depth of 12 inches or almost 24 inches.  That measurement is for the total depth of the cabinet, but inside the actual depth of the shelf is about 10 inches.  Most of our binders are a depth of 12 inches, which meant they would hang off the shelves and that is something we didn't want.  A cabinet of 24 inches wouldn't work for us either, since we were constrained by a window on an adjacent wall.  We could have a cabinet that was 15 inches in depth, which would take care of both of our issues.  So back to the drawing board we went and Jeremy drew everything up this time and calculated that we would need three sheets of plywood to make all of the cabinets, including the shelves.

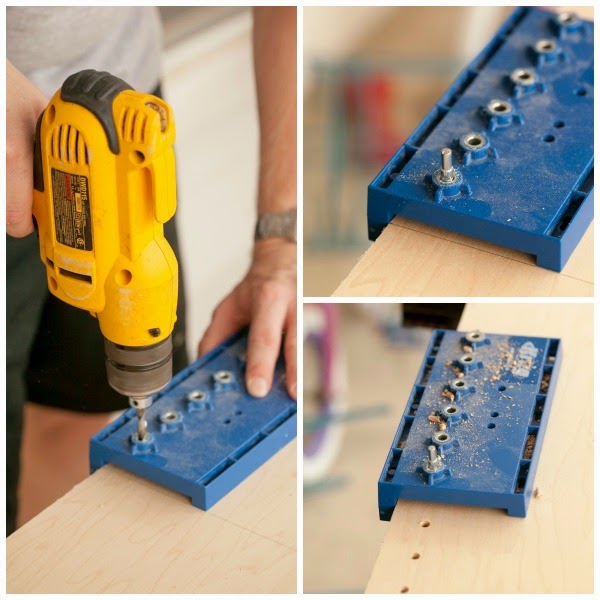
Jeremy used these plans for the cabinets from Ana White's site as a template.  Our measurements are slightly different (cabinet width is 24 inches and an overall depth of 13 3/4 inches), but he was able to use her plans as a guide.  The short and sweet breakdown of the cabinets is that he used the kreg jig to make a box and a face plate for each cabinet, for a total of four cabinets.  Jeremy also used his Kreg Shelf Pin Jig to allow us to have adjustable shelves in each cabinet.  He created the pin holes first before assembling the cabinets.


Since there will be a countertop on top of the cabinets, there was no "top" on the cabinets.  Instead of a complete top, a scrap of plywood similar in size to a 1x3 board was used for support.


The back of the cabinet was secured using a nail gun.  The back of the cabinet is only 1/4 inch in thickness, but the sides and bottom are plywood that is 3/4 inch thick.


Since the cabinets are going to be wall-to-wall in the office we won't need to fill the kreg jig holes!!  We purchased maple plywood this time since it has a nice uniform grain - we gave it a light sanding and the inside of the cabinet is nice and smooth.  Next up are the faceplates, which were constructed with Pine 1x2 boards.  The boards were kreg jigged together and secured to the face of the cabinets with the Kreg Jig on the sides, and with the nail gun on the top and bottom.  Jeremy did put two coats of Behr Powdered Snow on the faceplates prior to securing them to the cabinets, but this step could have been done after as well.

To create a platform for the cabinets to sit on top of, Jeremy created basically a long rectangular box out of 2x4 boards.


The part that you see sticking out is for the file cabinet that will go in the middle of the design.  The file cabinet wasn't part of the original plan - we were going to have a 3-foot cabinet in the middle and two 2-foot cabinets on either side.  I found a good deal for a used file cabinet that was the same height as our cabinets, but it was deeper so we had to account for that in the base frame.

Prior to securing the cabinets to the wall, Jeremy used the jig saw to cutout a piece of the back of the cabinet for the outlet.  Instead of trying to guess where to cut for the outlet, he put toothpaste on each corner of the outlet and then pressed the back of the cabinet against the wall.  Now he had four dots from the outlet and knew the correct size for the outlet.


The cabinets are resting on top of the base frame, but they are secured into studs on the back wall.  Eventually, the base frame will be covered with a baseboard, which will help give everything the complete built-in look.


We still have a lot to tackle in here and maybe if we are lucky we will finish by the end of the year, just kidding, but seriously!!!  All jokes asides, our next step is to order the doors...we are leaving that step to the professionals!  While we wait for the doors, I get to pick out the hardware!  #onehappymomma Then from here it is completing the tabletop for the cabinets, then onto the bookcases and of course removing the chair rail first.  Lots to do in our near future!

With much love,

Kristin

Follow on Bloglovin