
Well, I finally have an update on the office. Progress has definitely been slow when it comes to the office, but that is life I suppose. I wish I had a magic wand and poof the office would be all done, but unfortunately my wand is on back order!! We (aka Jeremy) have been able to make the cabinets, no doors yet, but the box of the cabinets have been completed and installed in the office.
Pulling from our main inspiration, the plan was to go with pre-fab cabinets from a box store, but after taking some initial measurements we realized we would have to make them ourselves. At the box stores, you can get a cabinet with a depth of 12 inches or almost 24 inches. That measurement is for the total depth of the cabinet, but inside the actual depth of the shelf is about 10 inches. Most of our binders are a depth of 12 inches, which meant they would hang off the shelves and that is something we didn't want. A cabinet of 24 inches wouldn't work for us either, since we were constrained by a window on an adjacent wall. We could have a cabinet that was 15 inches in depth, which would take care of both of our issues. So back to the drawing board we went and Jeremy drew everything up this time and calculated that we would need three sheets of plywood to make all of the cabinets, including the shelves.
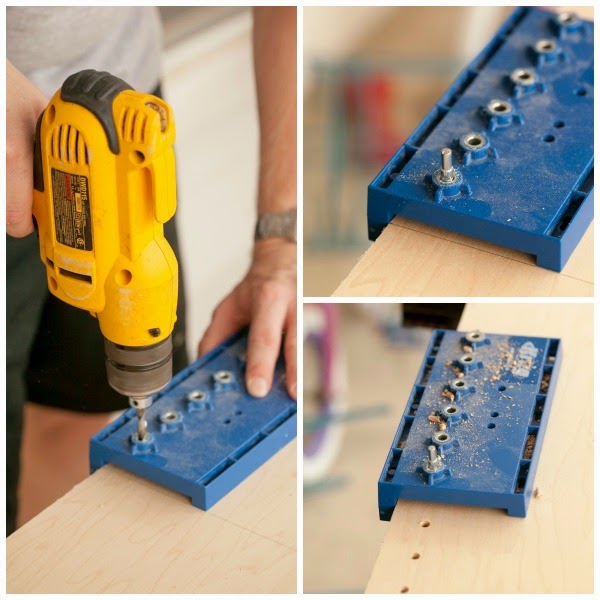
Jeremy used these plans for the cabinets from Ana White's site as a template. Our measurements are slightly different (cabinet width is 24 inches and an overall depth of 13 3/4 inches), but he was able to use her plans as a guide. The short and sweet breakdown of the cabinets is that he used the kreg jig to make a box and a face plate for each cabinet, for a total of four cabinets. Jeremy also used his Kreg Shelf Pin Jig to allow us to have adjustable shelves in each cabinet. He created the pin holes first before assembling the cabinets.


The back of the cabinet was secured using a nail gun. The back of the cabinet is only 1/4 inch in thickness, but the sides and bottom are plywood that is 3/4 inch thick.

Since the cabinets are going to be wall-to-wall in the office we won't need to fill the kreg jig holes!! We purchased maple plywood this time since it has a nice uniform grain - we gave it a light sanding and the inside of the cabinet is nice and smooth. Next up are the faceplates, which were constructed with Pine 1x2 boards. The boards were kreg jigged together and secured to the face of the cabinets with the Kreg Jig on the sides, and with the nail gun on the top and bottom. Jeremy did put two coats of Behr Powdered Snow on the faceplates prior to securing them to the cabinets, but this step could have been done after as well.
To create a platform for the cabinets to sit on top of, Jeremy created basically a long rectangular box out of 2x4 boards.

The part that you see sticking out is for the file cabinet that will go in the middle of the design. The file cabinet wasn't part of the original plan - we were going to have a 3-foot cabinet in the middle and two 2-foot cabinets on either side. I found a good deal for a used file cabinet that was the same height as our cabinets, but it was deeper so we had to account for that in the base frame.
Prior to securing the cabinets to the wall, Jeremy used the jig saw to cutout a piece of the back of the cabinet for the outlet. Instead of trying to guess where to cut for the outlet, he put toothpaste on each corner of the outlet and then pressed the back of the cabinet against the wall. Now he had four dots from the outlet and knew the correct size for the outlet.

The cabinets are resting on top of the base frame, but they are secured into studs on the back wall. Eventually, the base frame will be covered with a baseboard, which will help give everything the complete built-in look.

We still have a lot to tackle in here and maybe if we are lucky we will finish by the end of the year, just kidding, but seriously!!! All jokes asides, our next step is to order the doors...we are leaving that step to the professionals! While we wait for the doors, I get to pick out the hardware! #onehappymomma Then from here it is completing the tabletop for the cabinets, then onto the bookcases and of course removing the chair rail first. Lots to do in our near future!
With much love,
Kristin

No comments:
Post a Comment
Thank you for taking the time to leave a comment! All comments are moderated and might take a moment to appear.