Showing posts with label closet organization. Show all posts

Wednesday, July 9, 2014

Girls' Bedroom: DIY Closet System

As the countdown continues for the arrival of our newest addition, we decided to tackle a closet system for the girls' bedroom....probably a little crazy I know!  It has been something that we needed in there for a long time, especially since they share the closet.  It was definitely getting out of hand to the point where I didn't really know what each girl had in their proper sizes and on a few occasions bought extra.  We even had old toys in their closet that are more suited for babies - like a jumperoo!  So without further ado, let's take a peek at what the state of their closet was in a few weeks ago.  Let me warn you though it is definitely not a pretty picture and makes me cringe when I see it.


You might spy the plain Ikea Rast dressers shoved in their closet...like it needed more stuff crammed in there.  At the time we purchased the dressers for the nursery closet, we also purchased two dressers for each girl.  Our original plan was to stack the dressers on the back wall, but we had a slight problem.  There was an immovable box on the back wall that of course was not in the center so slight change of plans!

Before we could move forward, it was time to purge some items and clear out the rest and find a temporary place for the items we were keeping...aka the playroom and nursery have become the holding tank for it all :(  Needless to say I am anxious to get this closet re-do completed.  Anywho, once the closet was cleared out and the existing shelves and closet rods were removed it was time to get down to business.  We followed the same steps as we did for the nursery closet, except this time we used Zinsser Shellac-Based Primer to prime everything first.  We applied two coats of primer and then used our new HomeRight Finish Max Fine Sprayer to spray two coats of Behr Hazelnut Cream on the dressers.

After getting two dressers painted and ready to install it was time to do the other two dressers...except well we couldn't find the suction tube for the new sprayer.  I am not saying two precious little girls misplaced it, but I am not ruling it out either.  Either way, I had to call HomeRight to have them ship a new suction tube since that part isn't sold in stores.  They were super nice, but the bummer was that it would take 1 - 2 weeks to arrive.  So we opted to not lose too much time and painted the remaining dressers the old fashioned way with a roller.    

Just like before, the back of the dressers needed some support to allow us to secure the dressers into the wall.  We were fortunate to have one stud, but it was straight down the middle so our previous method wouldn't work.  Jeremy put three boards across the back that would allow him to secure each dresser into the stud.


Each dresser was stacked and the back secured to the wall.  These babies are not moving!!  Similar to the nursery closet, I painted the knobs on each girls' dresser in the color that they picked out from Sherwin Williams.


You might notice there is a slight gap on each side of the wall - this was done to allow for space to pull out the dresser drawers so it wouldn't hit the door trim.  We used a 1"x2" board to fill the gap that was simply nailed to the wall through the dresser.


Once both dressers were secured to the walls, it was time to add the pine topper.  There was a slight gap between the dresser top and the new pine topper, so Jeremy glued down thin pieces of poplar board.


Once the poplar boards were glued in place, Jeremy nailed the pine topper in place.  Later it will be caulked and painted once everything is installed.

Next step was to Kreg Jig the vertical walls for the three shelves above the dresser.


The Kreg Jig holes were left unfilled since we are planning to put an adjustable shelf system right next to it...so you will never see the holes!!

Similar to the nursery closet, we put a masonite board on the back of the shelves in the same color as each girl's knobs.  Then, Jeremy added the shelf cleats and shelves using a nail gun.


A piece of 1x2 will be nailed to the face of each shelf to give it the finished look later, but the next step was to add a shelf to the very top.  This shelf is attached to the verticals using the Kreg Jig and will actually go all the way around the closet to maximize storage.


So this is where I leave, sorry for an unfinished product, but we are working hard to get everything completed for a big reveal soon!!!  In addition to working on the girls' closet, we have been making some updates to the nursery, which I hope to share with you BEFORE her sweet arrival!!

With much love,

Kristin


Follow on Bloglovin

Thursday, May 29, 2014

Nursery Closet Update Part II

We have been working hard over here making preparations for the arrival of baby girl #3 and one of the biggest projects for her arrival is to have a functioning closet.  Her room has one of those step-in closets with a 9-foot ceiling so we really wanted to maximize the available space and of course make it budget friendly so I can do my happy dance!  (P.S. I am totally doing my happy dance)  I am too excited to wait so here is a little sneak peek of the finished closet :)


Before I get ahead of myself, let me remind you where I left you last time.  We had installed both Ikea Rast dressers and purchased all the material for phase II of this project.


I will apologize in advance for the lack of in-progress pictures, while my hubbie was working on the closet I was either with the girls or working on another project.  I will, however, do my best to give you the details!!

Before attaching the shelves to the dresser, we wanted to give it a little more substance so decided to add a pine topper.

{ via }


We purchased this at Lowe's for less than $11!  The only problem was that it wasn't wide enough so we ended up purchasing two in order to give us the depth we wanted and then used the Kreg Jig to put the two pieces together.

We debated on whether to stain the topper or to paint it the same color as the dressers, in the end we painted it all one color.  Since we wanted everything to look as seamless as possible, we did have to fill the slight gap in between the dresser and the topper.  Luckily, we had some spare wood out in the garage that was 1/8" thick and the perfect size to fill the gap plus a little caulk!


Now we did change one big thing on how we prepped the wood prior to applying the coats of paint, which was a HUGE time saver for us.  I did a little more research and found that a shellac based primer was an excellent choice to seal knots in the wood and had quick drying time.  We decided to go with Zinsser Shellac Primer.  For all of our painting, we decided to prime and paint outside to prevent any fumes and odors inside.  The weather last week was great so we took advantage and while the girls played in the backyard we set up an area to prime and paint.  I cannot say enough about this primer, but I will definitely say it is beyond awesome and has been a huge life saver for us especially in the time department!!

With the topper completed, it is time to add the two sides for the shelves.  For the shelving, we went with cabinet grade plywood, which only cost us $52, and we still have some left for another closet! The plywood comes in a 4'x8' sheet and we had Lowe's rip it into four strips, each 11 inches wide. Our first 1x11" board was used to create the two sides of our shelves, which are 33" in height.  Jeremy used the Kreg Jig to secure each side to the topper.  It seems the only picture I captured of this phase was on my phone :/


The very top shelf is also secured to each side using the Kreg Jig as you can see in the picture above. The shelf is the braced using a 3/4" strip, which Jeremy rip cut from a 1x2 board.  We went this route since the trim we plan to put on the front of the shelves would 'hide' the board that was bracing the shelf.

Once the top board was secured and braced into studs, it was time to move onto something we decided to add last minute.  We were thinking about ways to add a pop of color to the back of the bookcases...paint, wallpaper, fabric.  Well, we had some masonite board left over from our DIY wall chalkboard and decided to put that to use.  I painted it with four coats of the Sherwin Williams Gladiola that I used on the knobs.  It is secured to the wall using a little wood glue and the brad nailer.  From here, Jeremy was able to add the other shelves in the bookcase.  The bottom shelf is spaced 10 1/2" with the remaining two shelves spaced 10" apart and braced on all sides with a 3/4" strip.


Once the shelves on the inside of the bookcase were completed, Jeremy added a shelf on each side of the bookcase.  With all the shelving installed, it was time to add the trim to the front of each shelf.  We wanted to create a "chunky" look to the shelf so added a 1x2" to the face of all the shelves.  For the side of each bookcase, Jeremy ripped a 1x2 into 7/8" thick and attached using a nail gun.  We filled all the nail holes with wood filler and then sanded and touched up those necessary spots.  Sorry for the bad angle shot, but here is a picture of all the shelves (plus the clothing rods).


To have an anchor for the clothing rods, we used a spare 1x8" board that was cut down to 5 1/2" and the same depth as the shelf.  Jeremy added in some angle cuts, which match what is in our other closets.  We did have to purchase from Lowe's the holders for the clothing rod, which were about $2.50 each.  The clothing rod is the same rod from the original closet, just cut down to the appropriate sizes.


We are now in the home stretch!!!  All that is left is to install the baseboard so this baby will have that built-in look.  We found the same profile at Home Depot, but decided to add a little design with the additional block.


Sorry for the "unclean" picture, this was before a light sanding and touchups :)  The last hurdle we had to jump was the front of the dresser.  There was another gap between the dresser and the baseboard.  Initially, when we installed the dressers we added a 1x3" to the bottom of each one.  Unfortunately there was still a small gap now between that and the baseboard.  No problem, we have an abundance of scrap wood in the garage so to the rescue again!!  This time it was a piece of flat trim that Jeremy put behind the baseboard and with the help of caulk I can't even tell it isn't one piece.


Because I can't stop smiling when I walk in the nursery, let's see some more pictures :)


And because this wouldn't be complete without a good 'ole before and after picture!!


For now, we plan to leave the left side with one rod only for the longer clothing items in the future as well as a space for shoes.  We haven't decided if we will just purchase something to hold shoes or tackle another DIY....decisions, decisions!!

I know I gave a few of the price details throughout the post, but I wanted to include a breakdown and grand total for you all in one spot.

(2) Ikea Rast Dressers: $34.99 each (Christmas gift card was used for this purchase)
(1) Sheet of Cabinet Grade Plywood: $48 (we had a Lowe's coupon, original price is $52)
(3) Select Pine 1x2x8: $3.72 (again with a coupon, original price is $4.12)
(2) Pine Tread Topper: $9.62 each (again with a coupon, original price is $10.42)
(1) Gallon of Zinnser Bin Shellac Primer: $42 (still have over 3/4 left)
(1) Gallon of Behr Premium Hazelnut Cream in Semi-gloss: $35 (still have a little over a 1/4 left)
(1) Quart Sample of Sherwin Williams Gladiola: $4.50 (originally $7.50, but had a 40% coupon)
(3) Clothing rod holders: $2.42 (coupon, original price is $2.62)
(2) Pine blocks: $2.06 (coupon, original price is $2.28)

Grand total of $241 plus tax, with the Christmas gift card we actually spent $171!!!!  I know this doesn't include a few of the spare pieces of wood we had in the garage, but it definitely gives you a good estimate!  Our original idea was to go with a closet maid system that included three drawers and three shelves on top for $316 plus tax.  We were also going to add additional shelving to cover the entire width of the closet so that would have been an additional purchase of wood.

We might not have saved hundreds of dollars, but I am definitely loving our built-in system of six drawers and all that shelving! We might be crazy over here, but we are already sketching up a design for the girls' closet!

With much love,

Kristin


Follow on Bloglovin


Linking with:

I party with Remodelaholic

Monday, May 12, 2014

Nursery Closet Update

Remember way back in February when I told you we were looking to put in a closet system in the soon to be nursery....well I finally have an update on that little baby!!  Originally, we were thinking of putting in a Closetmaid system since it was pre-assembled and would cut out some of the work.  However, after doing more thinking and researching the price tag wasn't making me do the happy dance!  So we scratched that idea and now going a slightly different route...we are working on it a little at a time, but it will be done soon and I will be doing the happy dance!

For starters, we made a trip to Ikea to purchase an inexpensive raw pine dresser with a price tag of only $34.99 each!!  Start that happy dance now!


{ via }

We purchased two of the Rast dressers with plans to stack them and then build a bookcase and shelving on top.  My hubbie drew up a sketch so we could visually see what our vision will look like!!


The dark line on top of the dressers will be a pine topper that we plan to attach to give the dressers a little more substance, as well as what we will assemble the bookcase on.  The two dark shaded lines further up the drawing will be the clothing rods, we will be reusing the previous clothing rod so saving some money there!!  One of the things we love about this design is the shelving space it gives us as well as the amount of drawers to fill with the little ones clothes.

So far, we have done the prep work on the dressers (sanding and painting) and have installed them in the closet.  Before I show you them installed in the closet, let me walk you through the process of the initial prep work.

I had read a couple different tips in the blog world about preventing the knots from bleeding through the paint.  I used wood filler to putty over the knots and then once dry I sanded it all down using a palm sander for the coarse sanding and then by hand for the fine sanding.  Definitely not my favorite task of this project since it was time consuming, but so far I haven't seen any bleed-through.  Once that was complete, it was time to start painting.  I used Behr Premium Plus Ultra Hazelnut Cream in a semi-gloss finish.  We had previously used this type of paint, which is a paint + primer combo, on our shelves in our coat closet and have not seen any issues.  Here is a photo of the painting in progress after one coat.  I will admit I was initially scared after this first coat thinking it wasn't going to work, but after three coats it is looking pretty and glossy!


While I was painting, my hubbie was prepping the closet.  After removing the existing shelf, there was some slight damage to the texture on the wall.  We are no experts by any means when it comes to texturing, but decided to try our hand using a spray-on drywall texture purchased from Lowe's.  Jeremy sprayed the texture on the walls and then lightly knocked it down.


Like I said, we are no experts, but for texture out of can we are extremely pleased with the results.  After letting the texture dry overnight, we painted over it with the original color, Sherwin Williams Kilim Beige.  

Before the dressers could be attached to the wall, they needed a little more support on the back in order to give us something substantial to attach to the wall.  Jeremy added a 1x6 cut to the height of the dresser on the back side.  


This will allow for the necessary support when screwed into the studs in the closet.  We put more putty on the grooves, sanded it all down and then painted each side.  


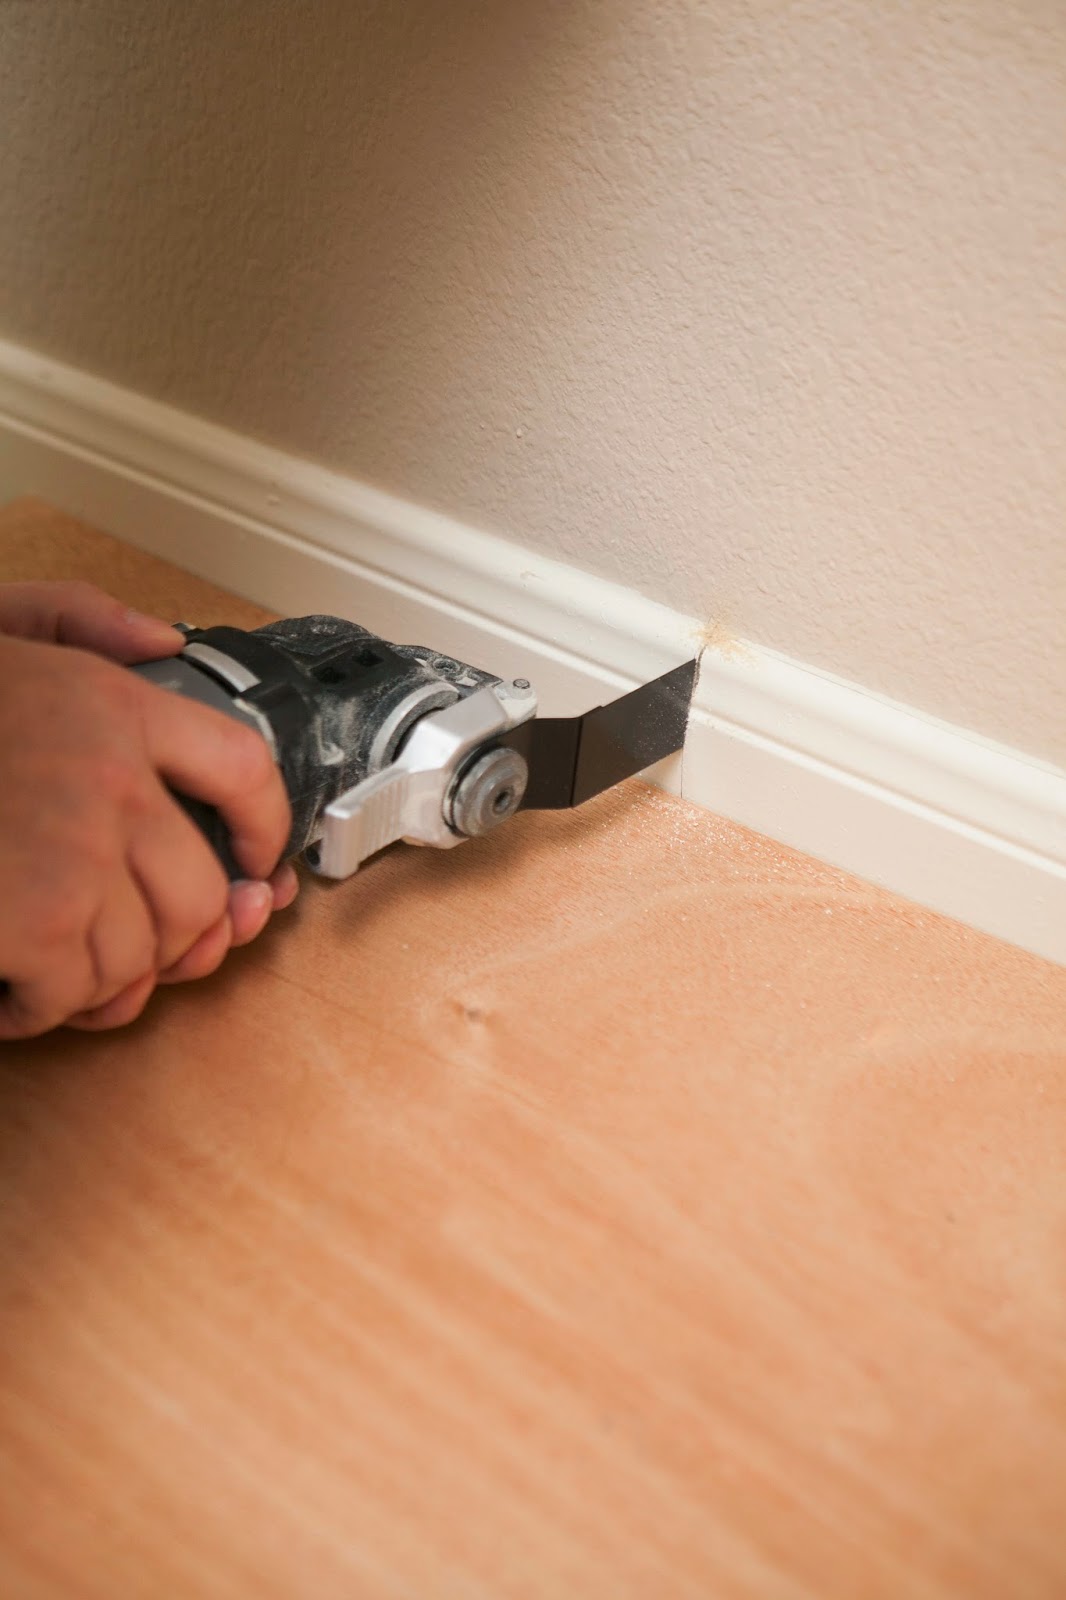
Pretty impressed myself...you can hardly tell it isn't one piece!!  From here these bad boys were brought upstairs to be attached to the wall.  We want to create the built-in look, so first we had to cut out a portion of the baseboard.  First step, mark the desired placement of your dresser.  Then, Jeremy used his Porter Cable oscillating multi-tool to cut the baseboard.  We put a piece of spare wood down to protect the carpet, which ended up being un-necessary due to a future decision made to remove the carpet.    


Then using an utility knife to cut the caulk from the wall, which makes it a little easier to pry it off the wall. 


After a little wiggle and a jiggle the baseboard was free!!  We placed the dresser in its new spot, but we weren't really liking how it looked sitting on top of the carpet...wasn't really creating the whole built-in look.  So we decided to cut out the carpet that the dresser would sit on.  Using the multi-tool again he was able to easily and quickly cut out the carpet. 


Now it was finally time to secure these babies to the wall.  Luckily there was one stud on the right side so Jeremy put four screws into the wall and that dresser isn't moving. 


The second dresser was placed on top and went through the same process to secure it to the wall.  Now, I could add the drawers!!  


To save some money on the knobs, which boy can those things get expensive, I painted them a pretty coral color (Sherwin Williams Gladiola).  To give me the desired look I wanted, I put four thin coats on each knob and then sprayed them with a clear gloss enamel.  Word of advice for attaching the knobs, do not use the screws provided by Ikea!!  We had on hand self tapping screws which made the job 100 times easier!       

  
We still have a lot of work ahead of us, but definitely feeling accomplished to get the dressers painted and installed.  We have purchased the wood for the shelving, pine topper for the dresser and the baseboard...next step to get them painted and installed!  

Anyone tackling a closet system??  

With much love, 

Kristin 


Follow on Bloglovin